Club Admins - Entering Matches, Scores, Rosters & Photos
Club admins are responsible for entering their club's schedule, submitting scores and the roster of players who played in any game (USAFL or metro) within one week of the completion of the game. In order for a player to receive nationals eligibility points for any game, that player must have registered and paid USAFL player dues within one week of the completion of the game, and the club admin must have included that players name on the roster for that game in the LMS.
If you need any help, support with the following contact your Regional Vice President and USAFL Operations Manager at operations@usafl.com
To Add A Match to Your Club's Schedule
The following instructions describe how club admins enter matches to their club's schedule.
Step 1: Log in
Step 2: Hover mouse over Add Content
Step 3: Select Match
Step 4: Submit ALL required Details
Step 5: Click Save
Please note, ALL matches are required to be submitted by June 30.
To Enter Scores for a Match
Club admins can submit scores for matches their club has played in. The Score Manager is available via the "Schedules & Results" -> Submit Scores item on the main menu.
Each match listed will have a text field displayed for the goals, behinds, and total score for both teams in the match.
Step 1: Log in
Step 2: Hover mouse over Schedules & Results in top menu bar
Step 3: Select Submit Scores
Step 4: Submit number of goals, behinds and total score for each team.
A value must be entered in each field for the match to be completed in the LMS. The LMS will only assign Nationals eligibility points to eligible players when the score is complete. So if a team scored 0 behinds make sure to enter 0, if left blank the system will read as an incomplete score and player points will not be assigned.
Step 5: Each field will be saved when you enter a value and then move to another field. There is no separate save operation.
When the Score Manager is displayed, it will list your club's matches that have not had scores submitted. Thus you will not be able to edit any scores. If you believe that a submitted score is in error, please email scores@usafl.com and your regional Vice President.
To Submit A Roster for a Match
Please note, ALL Rosters are required to be submitted within one week of the match date. For example, if the match is played on Saturday, rosters are due by Friday. Rosters close after one week and Club Admins are no longer able to submit rosters.
The following instructions describe how club admins enter a roster for any game.
Step 1: Log in
Step 2: Navigate to Club Portal Page
There are several ways to navigate to the Club Portal Page. The easiest is by clicking the club’s icon at the top of any page of the USAFL website.
Step 3: Click on the match that you intend to enter match details for.
In order for a match to appear in this list, it must have been entered into the LMS. See above if you need to add a match to your club's schedule.
Step 4: Click Manage Roster
This link will only be available to club admins and only up to one week after the match date. After that, club admins will not be able to update their match details for that match. Please note: people that were dressed for the match but didn't get into the game did not play in the match. Only those people that spent time on the field during time on should be added to a roster.

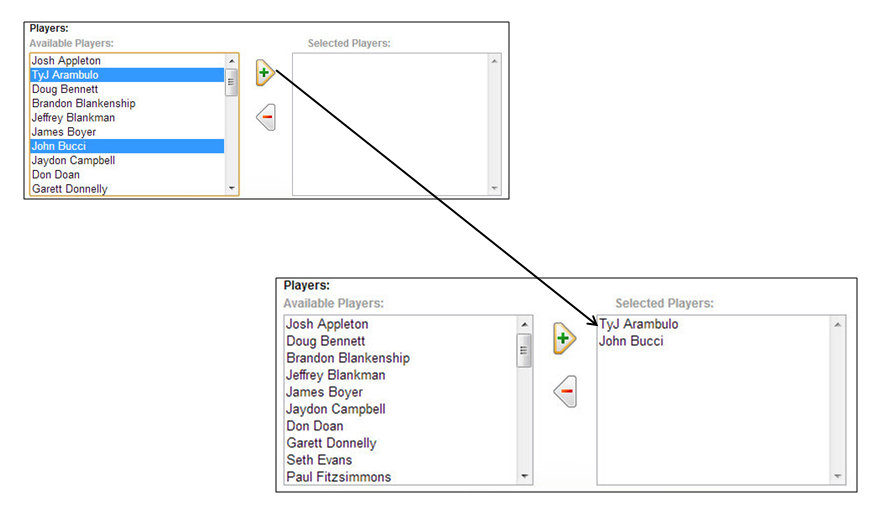
Step 5: Select Registered Players Who Played in Match
Select players from the list of available players who played in this match. To add a player to the list of selected players, click on that player’s name in the Available Players box, then click the green plus sign. This will move the player to the Selected Players box. Multiple players may be moved at once. To remove a player from the Selected Players box, click on that player’s name and click on the red minus sign.
All players who have registered with your club will appear in the Available Players selection box. This includes players who have not yet paid their USAFL player fee for the year. If a registered but unpaid player is added to the selected players list by a club admin, and that player then pays his/her USAFL player fee within one week of that match, the LMS will automatically give the player nationals eligibility points for that game. There is no action required on the part of the club admin. If that player pays his/her USAFL player fee more than one week after a game, that player will not receive nationals eligibility points for that specific game.

Step 6: Add Any Borrowed Players
The borrowed player functionality allows you to add the name of any registered player from another team who played with your team during a match. You may add a borrowed player to your match roster by first selecting the club the player was borrowed from and then selecting the name of the player. If you need to add an additional borrowed player, simply click the “Add Another Item” button below the borrowed players selection box.
If the borrowed player has not yet registered with the USAFL, you can add that player’s name to your roster using the Unregistered Player functionality described in Step 7.
A borrowed player may only earn nationals eligibility points if that player was borrowed from the opposing team.
For example if Team A and Team B are playing against each other, a player who is registered with Team B may play with Team A and get nationals eligibility points. However, a player registered to Team C, while allowed to play with Team A, would not receive nationals eligibility points for that game.
Step 7: Add Any Unregistered Players
If any of your club’s players is unregistered at the time you enter the match details, you should add his/her name using the unregistered player functionality.
If an unregistered player registers within one week after a game, the club admin should return to the system and add that players name to the roster using the registered player functionality described in Step 5 so the system recognizes the player and can award nationals eligibility points to that player.
Step 8: Add Team Photo
The LMS enables the club admin to add a club photo from the day of the match if desired.
Step 9: Add Team Sheet
The club admin should upload a copy of the team sheet from the match in order to provide proof that the players added in the electronic roster above did, in fact, play in that match. Acceptable file formats are PNG, GIF, JPG, and JPEG. As long as the image is of good enough quality to make all names on the team sheet legible, taking a cell phone picture of the team sheet immediately after the game for upload to the system later is likely the easiest and most convenient method for capturing the team sheets.
Note that player names listed on your team sheet for the day should include the player’s full name as listed in the LMS so that the team sheets can be compared to the electronic rosters.
Regional VPs will be responsible for verifying that the electronic roster matches the uploaded team sheet and may remove a player’s name from the electronic roster if that player is not listed on the uploaded team sheet.
Step 10: Save
Once you have added the match details into the LMS, make sure you click the Save button. You may return to the LMS to edit the match details at any time within one week of the completion of a match.
Step 11: Check Match Details
Once the match details have been entered the club admin should review the information for correctness by returning to the match page. Note that this information is visible to anyone, not just club admins. This information includes the match score, team roster, any uploaded team picture from the match, and uploaded team sheet.
Additional information on the match details can be found in the next module.